:max_bytes(150000):strip_icc():format(jpeg)/The-Best-Way-to-Soften-Butter-FT-DGTL1125-Hero-94a461ca852644f5b8c8bff166636ff7.jpg)
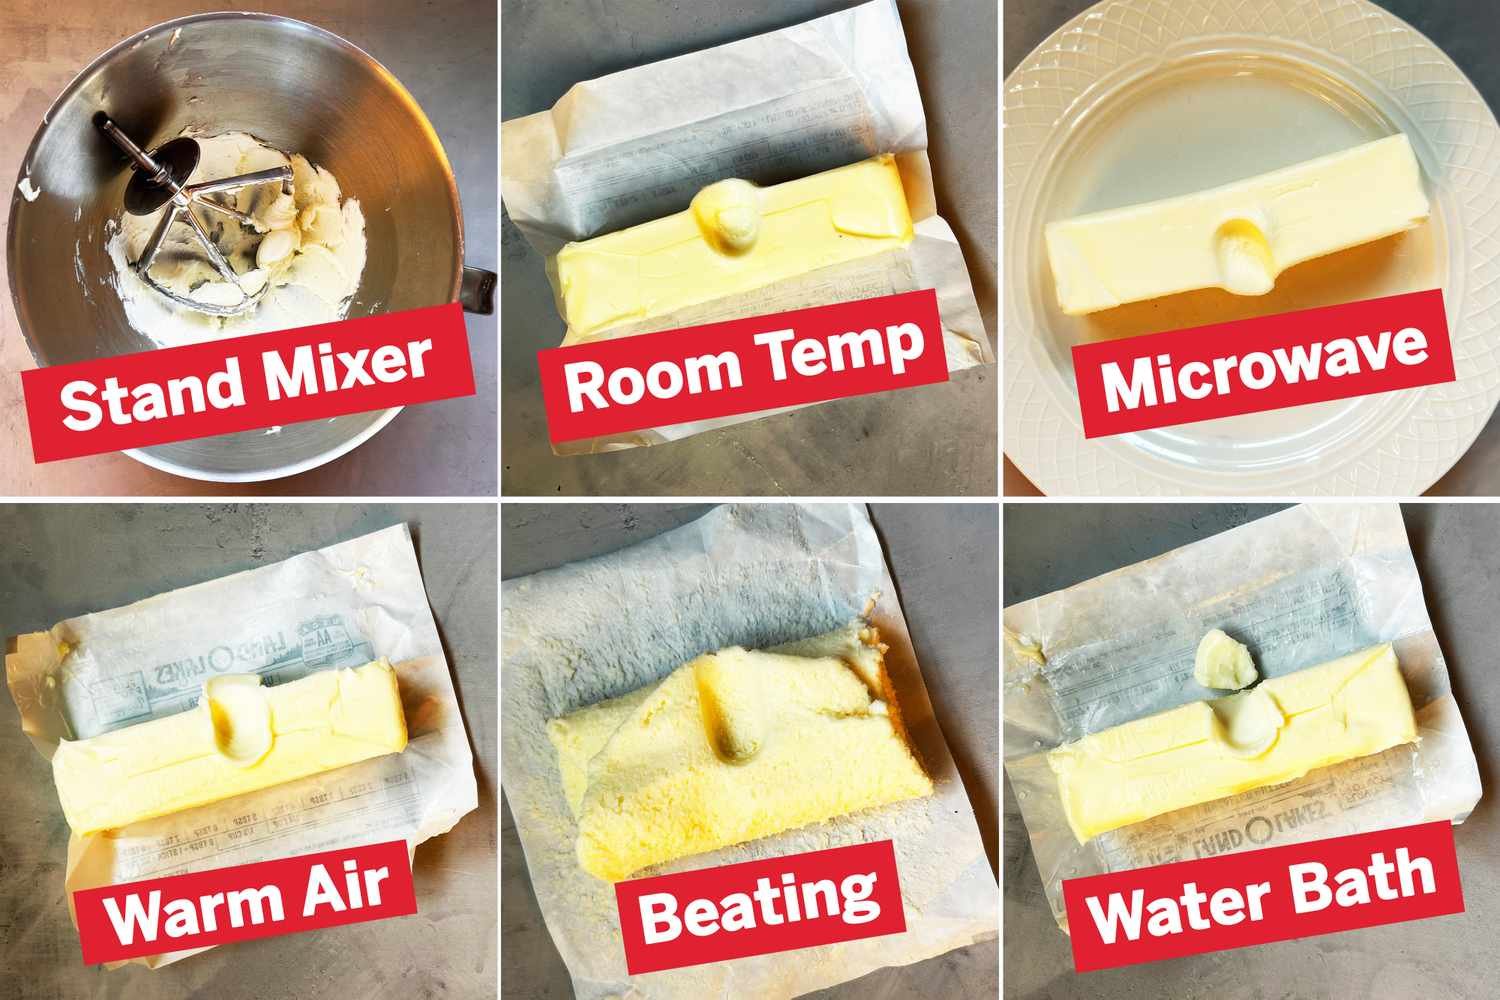
- Beating butter with a rolling pin is the quickest, most foolproof method for achieving evenly softened butter.
- A stand mixer or microwave are both effective tools, but proceed with caution to ensure you don’t melt or overbeat the butter.
- With a little forethought and a time-saving trick, simply setting butter out on your kitchen counter is a reliable method.
Softened butter is the key to success in certain baked goods, giving us tall fluffy cakes, extra-tender tart crusts, and crisp-chewy cookies. Even if you’re not a baker, softened butter is often an important ingredient in rubs for turkeys, and no one wants to spread rock-hard butter on a Parker House roll or their morning toast.
But waiting for a stick of butter to soften on your counter isn’t always possible. The internet is rife with tips and tricks for softening butter, and some of them do indeed work. Here are six of the most popular strategies — and the ones that are your best bet when your baked goods just can’t wait.
A word about my testing
For optimal performance, butter should register somewhere between 65°F and 70°F — this is the temperature at which it can be mixed or whipped into a light, fluffy, and airy state. But you don’t need a thermometer to tell you when butter is soft enough. For my testing I relied on a tactile cue: I checked to see that the butter would yield to my finger without me having to press too hard (i.e. I wanted it to be slightly firmer than putty).
As control, I used a stick of Land O’Lakes unsalted butter for each of the six methods. I also ran my tests on the same day at a consistent kitchen temperature of 64°F. Because this is on the cool side, it did affect some of my tests, so I noted that where relevant.
Lastly, I assessed each method based on how long it took for the butter to soften, how evenly it softened, and how easy it was to execute.
Water bath
Food & Wine / Charlotte Rutledge
Total time: About 10 minutes
Rating: 3/10
Method: Sealing butter in a water-tight plastic bag and submerging it in warm water is a way to incubate your butter without shocking it with extreme heat — at least, that’s the intent. In this test, I started with about 4 cups of water at about 80°F, then added the butter stick (still in its paper wrapper) inside the plastic bag. I then weighed the butter down with a jar so that it would stay fully submerged in the water and left it for 10 minutes.
Results: This method was a hassle, and resulted in butter that I wouldn’t have wanted to use in baking. The outside of the butter was too soft and greasy, while the inside remained too firm. When I pressed my finger into the butter, the center wouldn’t give, and my finger ended up slipping and pushing the soft exterior off with it.
Pros: None — I wouldn’t waste your time or effort on this method.
Cons: The butter doesn’t soften evenly with this method, producing a greasy exterior and firm interior. I also found this method to be a big nuisance and not the least bit rewarding.
Warm air
Food & Wine / Charlotte Rutledge
Total time: About 30 minutes
Rating: 4/10
Method: The idea behind this method is to create an incubated (warmer than room temperature) environment for your butter. You can do so by boiling water and pouring it into a heat-safe bowl that’s large enough to cover a stick of butter when turned upside down. After leaving the hot water in the bowl for 2 minutes, you pour it out and cover the butter with the warm upside-down bowl.
Results: I removed the bowl and tested the butter at 10-minute intervals to see if I could press my finger into it. Given the cooler temperature of my kitchen, the bowl was back to room temperature within 30 minutes, yet my butter still hadn’t reached its desirably soft state.
Pros: In a warmer environment, this method might have proved more effective. But there are other ways to achieve an incubated space for your butter. I tried adding boiling water to a small measuring cup, then put this inside a countertop toaster oven (a microwave would work too) next to a stick of butter. This achieved soft butter in 75 minutes (faster than just waiting for my butter to warm up at room temperature).
Cons: This method did not result in softened butter within the amount of time that the bowl maintained its warmth. The butter ended up greasy on the outside and still too firm on the inside. You also need to factor in the time it takes to boil water and heat the bowl with this method, and those steps can easily set you back an additional 10 minutes.
Microwaving
Food & Wine / Charlotte Rutledge
Total time: About 30 seconds
Rating: 7/10
Method: In my 1200W microwave, I microwaved the butter on a small plate at 30% power for 5 seconds at a time. In between these bursts of heat, I turned the butter onto another side to promote even heating. This method can be temperamental since the microwave can take butter from refrigerator-hard to explosively melted (from the liquid in the butter turning to steam and bursting out of the fat) in a matter of seconds. Since this is not what you want when attempting to achieve softened butter, the trick to this method is to microwave the butter in short increments at moderate power.
Results: Applying gentle, incremental heat and turning the butter are key to this method. Although the butter wasn’t entirely softened on the inside, it wasn’t greasy on the outside (like it was after some of the other tests), and I could fairly easily press my finger into it and get a nice indentation.
Pros: This method will work regardless of the temperature of your kitchen. It’s also the quickest butter softening method.
Cons: The butter won’t be evenly soft, and there’s always a risk of making the butter too soft if you don’t proceed carefully.
Waiting
Food & Wine / Charlotte Rutledge
Total time: About 90 minutes
Rating: 7/10
Method: I tested this method a couple of different ways in my cool 64°F kitchen: I left one stick of butter out on the counter in its wrapper and I cut the second stick into 1/2-inch cubes before putting those into a wide, shallow bowl to warm from there.
Results: The stick of butter took well over 2 hours to soften, while the cubed butter took 90 minutes. Neither of these was what I would consider quick, but cutting butter into pieces does help to shave some time off the waiting. In a warmer kitchen, the butter would likely soften more quickly.
Pros: This method results in reliably and evenly soft butter that’s ready for any of your baking projects. It’s also one of the easiest methods to execute, especially if you’re simply leaving whole sticks of butter out on the counter.
Cons: You need a good amount of forethought to soften butter using this method, especially if your kitchen is on the cooler side. Conversely, if you have a warm kitchen or environment, you’re going to want to bake with your butter as soon as it has softened. If you let it warm up too much, it’ll start to turn greasy and may separate, which could result in suboptimal baked goods.
Stand mixer
Food & Wine / Charlotte Rutledge
Total time: 6 to 9 minutes
Rating: 8/10
Method: This method physically works the butter to soften it, but a stand mixer fitted with a paddle attachment does the work so it’s not too taxing. I started by cutting my butter into 16 pieces and putting them in the mixing bowl. I then turned the mixer to medium speed and allowed it to run for 2 to 3 minutes before stopping and scraping the butter from the bottom and sides of the bowl as well as the paddle. I repeated this process a couple more times until the butter was pliable and creamy.
Results: The mixer made quick, effective, and light work of softening butter. In addition to being soft, the butter came out lighter and creamier than with the other methods, and it wasn’t greasy.
Pros: This is often my go-to method of softening butter if l’m going to use a stand mixer in my baking anyway. It results in butter that is not only pliable but light and creamy, which is desirable when you want to end up with fluffy, airy baked goods like cakes.
Cons: Not all recipes that call for softened butter want that butter to be light and creamy. Some cookies (like shortbread and other shaped or decorative cookies) are best with minimal air mixed in, so this method wouldn’t be great in those cases. Also, if your stand mixer isn’t needed for the recipe you’re making, this method requires unnecessary extra cleanup.
Beating with a rolling pin
Food & Wine / Charlotte Rutledge
Total time: 10 to 15 minutes
Rating: 10/10
Method: This method takes a little elbow grease (or butter) compared to the similar stand mixer method, but you might just find it therapeutic. My preferred way to execute it is to keep the butter on its wrapper and place a piece of parchment paper on top of it. Then it’s time to bang away with a rolling pin until the butter is relatively evenly flattened to about a 1/2 inch. Next I fold the butter into thirds like a business letter, rotate it 90 degrees on its paper, and repeat the process a handful of times.
Results: The butter became visibly more pliable each time I pounded and folded it. Because the butter warmed steadily and evenly during the process, there was never any sign of greasiness or separation. Plus, in the end, my finger left an imprint that was as smooth as…well, butter.
Pros: This method is not only quick and effective at softening butter, but it also allows you to feel the butter get softer and more pliable as you work with it. If you’re someone who appreciates the tactility in baking, you’ll likely prefer this method too.
Cons: The physicality of this method may not be for everyone.
Final takeaways
To effectively and efficiently soften butter when time is of the essence, break out your rolling pin or stand mixer. If you really don’t have more than a minute to spare, you can get the job done in the microwave, using caution. I don’t recommend incubating your butter in warm water or air, though a soak or sauna for the cook or baker seems like a great idea.